
The Day I Operated On My iMac
May 27, 2015
I have owned my 27-inch iMac (late 2009 model) for nearly five years. Until a year ago, it served me well without any hardware upgrades other than adding external hard drives for backup. I was satisfied with the 1TB internal drive and the 8GB of RAM was just about enough. However, the computer was becoming sluggish when running several programs, so I knew I would be facing a choice soon: upgrade my components or buy a new one.
I decided not to make a decision until Apple announced a new iMac. Soon after the current 27-inch model was released, with its stunning 5K Retina display, I checked one out at an Apple store. Yes, the display was better, but was it worth spending around $3,000 to buy what I needed? I knew I’d be lucky to get $800 for my old computer so it would mean a net outflow of around $2,200.
Rather than drop thousands on the new Retina iMac, I decided to whip out the screwdriver and set to updating my RAM and hard drives for a performance boost. Upgrading my current iMac would give me everything except the Retina display and a Thunderbolt port—two things I decided I could live without. The processor in my iMac was fast enough for my needs—the choke point was the amount of memory and speed of the drives.
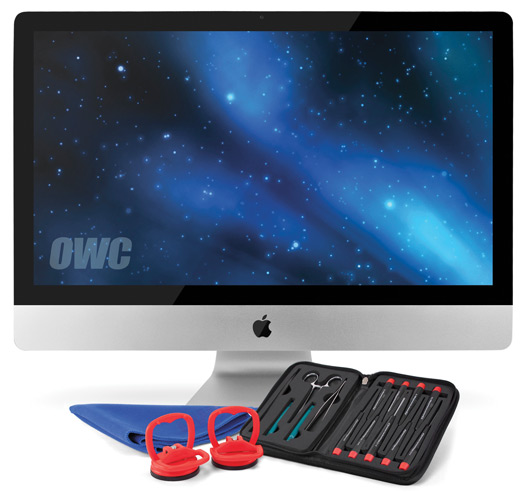
The OWC kit contains the tools needed for working on the insides of an iMac.
Desktop PC users and owners of the older Mac Pro have it made when they want to upgrade hardware; they can just open the case and replace cards and drives relatively easily. But don’t be intimidated by the iMac—or for that matter, a Macbook Pro or Air. Even though it looks like a closed system, it’s possible for much of the internal hardware to be upgraded. Sure, it takes a little more nerve, but thanks to good online instructions on several websites such as iFixIt.com and Other World Computing (OWC at www.macsales.com), it’s perfectly feasible for anyone who knows how to use a screwdriver—and is not too technophobic!
What’s Inside Your Mac?
Anyone who has experienced a computer, such as the MacBook Air, with a Solid State Drive (SSD) instead of a traditional hard drive will know that the speed increase when booting up and opening programs is phenomenal. Upgrading to an SSD is the best thing you can do to rejuvenate your “old” computer.
I elected to get the components from OWC, having had experience with this company many times in the past 20 years. Known for specializing in Macs, the website is a comprehensive one-stop shop. I decided to replace my non-functioning optical drive with a 480GB SSD drive (cost $265 with adaptor and DIY kit) and the internal 1TB hard drive—which was full and showing signs of nearing the end of its life—with a new 2TB hard drive ($99). Incidentally if you think your hard drive is going bad, use a program such as Drive Genius or DiskWarrior to check its status and even recover damaged files.
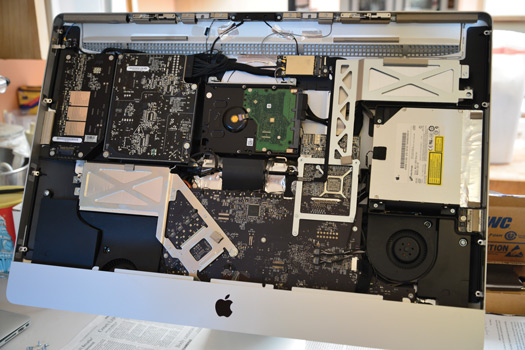
Once the glass cover and LCD screen are removed, you can see the guts of the 27-inch iMac. The main hard drive is in the center and the optical drive is to the right.
First, I added two modules of 8GB RAM memory (for $160) replacing one of the two original banks of 2 x 2GB RAM modules, giving me a total of 20GB RAM. This is easy and can be done by anyone because there is a small access door at the bottom of the case for user-friendly upgrading. Before I made any other modifications, I made sure the new memory was working.
Believe it or not, the front glass screen on an iMac is held on by magnets. OWC provides small suction cups in its DIY kit so you can gently pull the glass free from the frame and remove the LCD screen—which is held in place by eight screws—and get to the computer’s guts. Some of the tasks are fiddly, but unless you have giant fingers it’s pretty straightforward.
It would take several pages to describe the exact processes involved and the differences between all the iMac models, but OWC’s website provides detailed videos and step-by-step instructions that take you through what’s needed to open the iMac case and install new hardware. Although it looked daunting at first, it turned out to be very easy in practice. As long as one is careful when detaching cables and making sure they are plugged back in correctly, the tasks are simple.
I set up my system so that I am only loading the OS and programs on the SSD while using the 2TB hard drive for data storage. Rather than just transfer everything, including five versions (!) of Photoshop, from my old hard drive, I decided to take the opportunity to create a clean installation with the latest Yosemite OS. This meant getting everything up and running was a bit more complicated as I had to re-install programs, often from their original installation disks.
I placed the old internal drive in a NewerTech (sold by OWC) miniStack enclosure case ($69), so I can still access old programs and data easily. In fact, I can also boot up from this drive if needed, although I have not had to since I did the upgrade. So far, I’ve found that all my reguarly-used programs work on my rejuvenated iMac. If self-operating on your Mac is too daunting, OWC or your local independent Mac store are good backup options.
Was the Upgrade Worthwhile?
In one word: yes. The iMac boots up and loads programs about five times faster now. It boots up so quickly, in fact, that I now turn it off if I’m going to be away overnight. I also no longer find Safari getting sluggish even when I have dozens of windows open.
Bottom line: for a modest $500 to $600, I have what feels like a new computer. As long as the main motherboard, display and graphics card keep working (they are too expensive to replace economically), I reckon my iMac will be good to go for another few years.
Related Articles
Sony’s Nex-Gen FE 85mm f/1.4 G Master II Prime Lens
September 24, 2024
For many photographers, a fast, 85mm prime lens is a dream lens. It’s perfect for a variety of portrait styles and can produce the dreamy bokeh that is the hallmark of large aperture glass. The latest 85mm prime on the market is the second generation Sony 85mm f/1.4 G-Master II. The original was introduced eight years ago, to meet (or...
More »
Canon Announces New RF28-70mm f/2.8 Zoom Lens
September 19, 2024
Canon released a new standard zoom with its RF28-70mm f/2.8 IS STM lens. This lens provides a versatile focal range similar to the RF24-70mm f/2.8 L USM lens but at less than half the price: $1,099 vs. $2,499. Granted the L designation of the older lens is, at least partly, responsible for the price difference but the new 28-70mm will...
More »

Canon Launches Two Pro-Level Cameras
July 18, 2024
Canon has officially launched two new, pro-level R-series mirrorless cameras: the 24-megapixel EOS R1 with its high speed performance and the 45-megapixel, high resolution EOS R5 Mark II. Not surprisingly, the R1 with its 40fps burst shooting will appeal to sports photographers and photojournalists—hence its built-in Wi-Fi and Ethernet. Of course, we expect to see this camera in action at...
More »
