
Tips + Techniques
Fun Halloween Photography Tips and Tricks
October 28, 2022

Smoke—whether from Atmosphere Aerosol, a smoke bomb, sparklers, or incense sticks—is a popular go-to that complements Halloween images quite nicely. Just make sure to use them as directed to avoid any real-life nightmares.
The following is excerpted, with permission, from SLR Lounge photographer and educator Pye Jirsa‘s article on Halloween Photography Tips and Ideas, recently published on adorama.com (which is also where you can access the full article that includes Pye’s 10 tips).
Halloween is great for getting dressed up or trick-or-treating with the kids, but it also offers a special shooting opportunity for photographers. This unique holiday provides built-in characters, props, and scenes that we can use for a creative photoshoot. Here are 4 Halloween photography tips you can easily put to use.

4 Halloween Photography Tips:
Halloween Photography Tip #1: Use Props
We often think of props as objects we use to complement our subjects (which is a great use for them). But, we can also feature the props themselves as our subjects. Put together a few of your favorite Halloween items, compose your shot, dim the lights, and capture Halloween still-life magic. Of course, you can put these props to further use by placing them around your subject when capturing classic Halloween portraits.

Tip #2: Create Drama with Lighting
While lighting plays an important role in all photos, it is absolutely the key ingredient for setting the mood for Halloween photography. You’ll want to lean more towards the dark and dramatic side, using shadows and contrast to capture the spirit of Halloween. In terms of lighting patterns, then, you’ll mostly avoid flat lighting and opt for harsher angles, whether from the side, underneath, or above your subject. You can learn more about lighting patterns here in this video on Adorama’s YouTube channel.

Dramatic lighting for Halloween photography does not require the use of flash, but it can afford you the most control, especially depending on the location. For indoor shoots, natural light through the windows or any areas in which you can control the amount of light entering the scene can work well if you don’t have (or want to use) flash. Closing down the curtains or placing v-flats near the windows can help block out light when needed. Other light sources, for both indoors and outdoors, include candles (like those used inside jack-o-lanterns), flashlights, or other constant lights. Even a phone light will work.
[Read: Photographer Kills It With Skeleton “Boo-doir” Session]
If you plan to shoot outdoors, you’ll want to wait until it’s darker, unless you have a dark neutral density filter and one or more powerful flash units.
Tip #3: Capture Silhouettes
One of the easiest ways to use light to create striking, or in this case, creepy portraits, is to backlight your subjects for a Halloween silhouette. The general technique for creating silhouettes still applies, but this time around, we want to surrender some clarity and embrace the mystery. What I mean by that is we can focus less (literally) on capturing a perfect silhouette and instead reveal only traces of recognizable shapes.
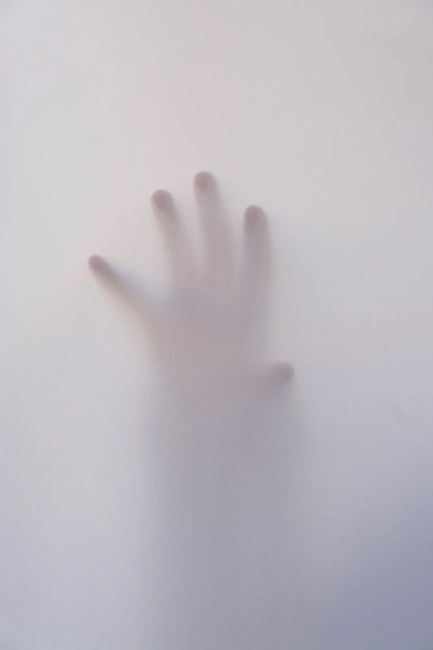
To do this, we just need a semi-transparent surface like a scrim/light diffuser, a bedsheet, or a frosted acrylic sheet and a backlight. You likely have a scrim, but another affordable way to make this happen on a larger scale is to purchase a piece of frosted glass static cling. They can come in multiple sizes and are easy to apply and remove from windows. If you don’t have a strobe for the backlight, a flashlight will do.
Experiment with different distances between the subject and the surface as well as the intensity of the backlight. Doing so will give you a variety of more or less pronounced silhouettes with varying degrees of detail for the subject. It’s also worth noting, the ambient light in the space should be relatively dark.

Of course, if you can pull off a shot like the cat in front of the moon pictured below, then, by all means, get a crisp silhouette for your Halloween portraits.
[View: Photo of the Day: Renaissance Queen]
Tip #4: Make Ghost Trails with Long Exposures
Why not take advantage of tricks like long exposure to capture our subjects in ways we could never do with our naked eye? In the video above, Daniel Norton shares a quick trick with a tripod and multiple flashes that you can use to create creepy ghost trails.
Here’s another simple motion trick you can use that doesn’t require flash. First, place your camera on a tripod and slow your shutter speed. Then, pose your subject and lock in your focus. Finally, click the shutter and have your subject move around, maybe panning his/her head left and right, before holding perfectly still for the last half of the time that the shutter is open. You can achieve similar results using one on-camera flash set to rear-curtain sync, or by creating a composite in post, changing the opacity of different layers, and adding a motion blur filter to the “extra” layers.
Related Articles

Why Felix Kunze Thinks We’ve Been Overcomplicating Lighting (And What He’s Doing About It)
July 24, 2025
When it comes to lighting in photography, most of us instinctively reach for soft, flattering light. We diffuse our flashes, shoot through umbrellas, and seek out cloudy days. But what if I told you that some of the most striking portraitYou know the moment: your subject is ready, you’ve got about five feet of space to work with, and the...
More »

How to Photograph Fireworks for Couples Portraits
October 24, 2024
Fireworks aren’t just for the Fourth of July! You’ll find them regularly at theme parks, sporting events, and maybe more surprisingly, at weddings. For the latter, fireworks offer photographers a wonderful opportunity to capture epic couples portraits with a truly unique backdrop. Of course, if you’re not familiar with how to photograph fireworks, there are some basic tips you’ll want...
More »

Why Top Photographers are Embracing Hard Light (And You Should, Too)
October 23, 2024
When it comes to lighting in photography, most of us instinctively reach for soft, flattering light. We diffuse our flashes, shoot through umbrellas, and seek out cloudy days. But what if I told you that some of the most striking portraits actually come from embracing hard light? That’s exactly what renowned photographer Roberto Valenzuela teaches in his groundbreaking new Dynamic...
More »
