
How To Edit a Wedding in 2 Days or Less
September 18, 2013
As a photographer, there is no bigger thrill than to be behind the lens capturing wonderful memories for clients. But as the dance songs fade, the last guests disappear into the night and you find yourself dumping your cards into a laptop in your car (I never make it all the way home on a shoot, call me paranoid), the inescapable dread hits: it’s time to edit.
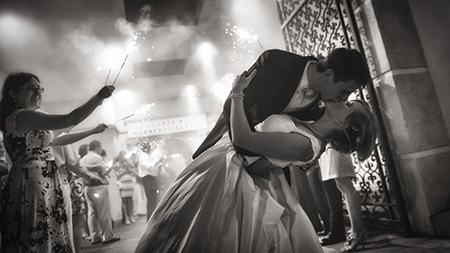
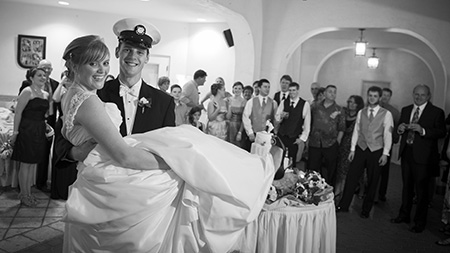
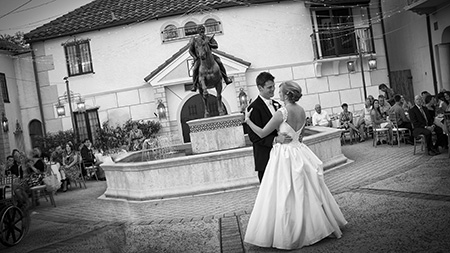
All photos © RC Concepcion
The scenario is always the same: You’ve shot thousands of frames that need to be gelled together into a story—fast. Like, “it’d be nice if I had a rough draft of this tomorrow,” kind of fast. You have other jobs waiting, and no luxury of wasting time. This is the truth of the working photographer.
“Hunters aren’t cooks,” Henri Cartier-Bresson famously stated when describing his lack of interest in photography after getting the picture “in the box.” Luckily, there are ways to take your initial edit time from what feels like forever, to a couple of days—sleep included.
Pre-Shoot,
Synchronize Your Clocks
As a photographer, you understand that the documentation of a wedding follows a chronology of events that take place throughout the day. And it’s much easier to find the best moments if you look through images in sequential order. One way to ensure this linear process of editing is by making sure all of your cameras used are synced to the correct date and time, that way you can import the images and sort them by the time captured. Five memory cards of imports can then be fed into a stream that makes chronological sense, and allows you to keep your attention focused on individual moments. It will also help you become organized and find the images you need quickly.
Sunday, 10 a.m.
Dump the Junk
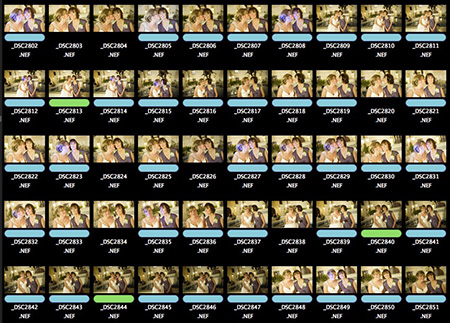
As much as we like to think that every click of our shutter will be a great shot, the fact is that many of these images can be thrown away. If you have 100 pictures, but in reality 30 of those are out of focus, the job is actually smaller than you think. Get rid of those images as quickly as possible; the best way to do this is to do this in iterations.
Step 1: Load your first set of images into a bigger window and look at the first picture no longer than two seconds. If there’s nothing glaringly wrong in the shot, mark it as acceptable using whichever method your program lets you do (different programs have different flags—from “Pick” to “Winner” to “1 Star”). Move to the next. If you spend more than two seconds looking at any one photo, immediately skip it and move on. The goal here is to land on the images you know are not good, mark them as rejected and move on. You’ll now have three sets of images: Those flagged that “work,” those you passed on, and those you need to delete.
Step 2: After deleting the rejected images, go back to only the ones you passed on and start round two of this process. By not getting into the minutiae of which picture is the best, you immediately get rid of the trash, and make the job smaller.
Step 3: The only thing that I add to this process is what I call the “5-Star Kicker.” While making edits, If I run into a photo that I know is a stunner, I flag this image separately from the group (this is where I use my 5-star ranking). Then I break for lunch.
2 p.m.
Organize,
Add Metadata
As you import images to your computer, take all that are particular to a specific moment in the wedding (for example, “getting ready”) and place them into a group. Make sure there are no other pictures from the event that appear in that group. This will take the task of culling images and break it from “I’ve got 3,000 pictures to go through” to “I’ve got eight sets of images I have to work on.” By doing this you will only be looking at the pictures for one specific moment in time, which makes the process less psychologically daunting.
This is also a good time for you to add any metadata to images. While this may not necessarily help your editing process, adding the information en masse while it’s fresh in your head will help you find images later in the process should you need to. Metadata is always a topic that photographers hate, but it’s because the photographer hates having to do it to 40,000 images months after a shoot. It will take you seconds during the import, and save you the hassle later.
4 p.m.
Leverage Global Profiles and Sharpening
Most photographers are now shooting events in a RAW format. While RAW allows you the most control of your image from an exposure, contrast, color and sharpness point-of-view, it tends to bypass the fact that the computer in your camera can do some really cool processing. If you look in the back of your camera when you shoot an image, you’re looking at a JPG thumbnail of what your camera did with the RAW file—the camera applying all of the secret sauce that each manufacturer is known for. Depending on the software you use, these treatments of the RAW file may not make it to your final edits.
Programs like Lightroom now allow you to apply a Camera Profile to your image, so that settings mimic what you would see on the back of your camera. Applying these profiles to your images in bulk can get rid of a lot of the original tonal edits that you’ll make to your RAW files—getting you closer to a final result. Because most RAW files will not have sharpening applied to them, it’s often a good idea to apply a bit of sharpening to the images during this pre-edit process (known as pre-capture sharpening) to make sure you’re judging a photo as fairly as possible before making additional edits.
5 p.m.
Set Tone Presets for Groups
When you’re editing an image of a bride coming down the aisle, you may decide to use post-processing techniques that are specific to the venue in which the wedding took place. Whichever settings you use to make the corrections to this shot can easily cover many of the shots that were made during the ceremony because the light likely remained the same. Work on one of the images in the series and save the changes as a preset.
Highlighting a group of images from that same moment, apply those develop settings to all of those images to get you closer to a vision on a group of shots. It’s a lot easier to go through the images and tone only one or two of them, applying the changes to a whole group than it is to try to replicate the same tones individually.
6 p.m.
Build an Initial Story
Now that your images have been culled down to a manageable amount and have a consistent feel, go through the individual moments of the ceremony and start building the story. Don’t worry about getting all of the nuances of the story exactly right at this point; the goal is to just get the big details down into your book. Scour through the takes and find some quick establishing shots for the idea that you’re working on. In this step, you’re trying to build an initial view for the job that you’ll revisit later. Think of it as moving into a house—for now, you just want to get the furniture in the rooms. You’ll worry about where they fit later.
9 p.m.
Get Some Rest
You would be surprised how much your feelings will change about an image once you have a bit of distance from it. By setting up an initial layout and then giving it some space, you can come back to the project with a fresher set of eyes, and make a more critical assessment of what needs to be done.
There are, however, those moments where you will come back to the job and say, “Wow. this is perfect as it is.” But those are incredibly rare (and when it happens, write it down and do a jig).
Monday, 10 a.m.-3 p.m.
Recast and Edit
Once you’ve edited your shots down to a realistic level and
given yourself time and distance to think of the job a little more tactically, go back and look at the overall project with a re-casting eye. By revisiting the moments you set up, you can say to yourself, “Is this the best image picked?” Using the date and time of the image, you can now go through your take with a more discerning eye and quickly browse for other contenders to fill any holes in the project narrative.
Because your book is now nearly complete, your role becomes more like that of a director. You are recasting that moment, and it doesn’t quite feel like you’re trudging through thousands of images.
It’s at this point—and only at this point—where I say to myself, “Now I am going to fire up Photoshop and start making these good images great ones.”
Related Articles

Pro Tips: Social Media for Wedding Photographers
October 10, 2024
Wedding photography is one of the most competitive markets in the world, and these days, having an online presence is an absolute must! In a past article, I went into great depth on how to create a standout website–the cornerstone of your online presence–as well as how to build credibility with online reviews and testimonials. Read all about it here....
More »
Joyful Family Photo Sessions with Emily Cannata
October 3, 2024
“My approach to all families is to have sessions that feel like joy!” says Emily Cannata, winner of the Elena S Blair Mastermind Contest. Cannata, who is based in the Austin, Texas area, is a natural light photographer who shoots newborn, senior, and family photo sessions. She recently participated in Elena S Blair’s Mastermind Program, which offers coaching, business strategy,...
More »

Hire Employees to Expand Your Portrait Business: Amy Minshull Q&A
September 18, 2024
“Taking away the part that makes it hard to be an artist was the best decision I could ever make,” says Amy Minshull, regarding her decision to hire employees into her portrait business, A Moment Photography. Minshull, a North Platte, Nebraska photographer began her portrait business on the side as a stay-at-home mom, looking to make just enough to pay...
More »
