Beauty, Glamour + Fashion
Not too long ago, I had a conversation with a retoucher who was looking to join my team. I gave him an image from a recent test shoot and asked him to fix it up, and when he sent back the results, I was a little shocked. He had removed all of the model’s beauty marks and freckles! When I asked him about it, he posited that he wanted to create “flawless” skin. I brought up the fact that I didn’t consider these things “flaws” but attributes that made a person’s face unique and interesting.
Different people have varying aesthetics when it comes to retouching. But at the end of the day, I want to celebrate my subject’s individual traits, which brings me to my retouching process.
The first thing to remember is that everyone’s skin texture is different. With that in mind, here’s my process for retouching skin, without changing the subject’s natural qualities.
Step 1: Initial Adjustments
I do a basic color correction in Lightroom (or Capture One) before exporting to Photoshop, which is where the real work begins. First, I tap into the Liquify tool and use it to make adjustments to the hair, as well as minor adjustments to the eyes, catchlights, hands, arms, etc. This is one of those tools where you definitely need to use restraint as a little goes a long way. The end goal of this step is to make it look like you haven’t done anything at all.
Step 2: Frequency Separation
I am an advocate of finding a skin-retouching method that works and makes sense to you and going with that one, as there are a lot of ways you can go about it. For me, that method is frequency separation (FS). Without going into all of the technical details (as there are plenty of online tutorials for that), FS is basically breaking the image into two layers: one for color and tone, one for texture. In this way, you can adjust the tones in the skin without affecting the texture, and vice versa.
I like the FS method because I find it to be the route that gives me the most natural results. I start on the texture layer and remove any blemishes, while being careful not to remove elements that are inherent to the skin, like beauty marks and freckles. Then I do an initial pass on the color layer to even out the transitions between highlights, midtones and shadows.
Step 3: Localized Curve Layers
For more persistent areas of discoloration, the most common being under the eyes, I’ll select the area to be modified, feather the selection so it has a super soft gradient edge, and then use curve adjustments layers. One key technique here is to use the individual color channels as well as the overall RGB curve.
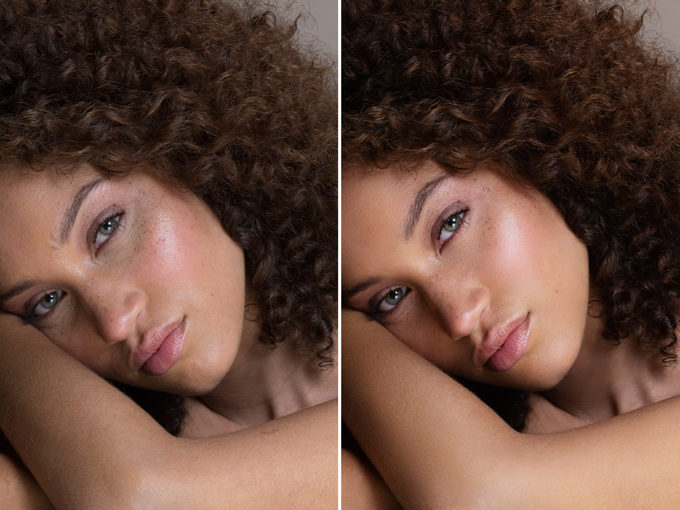
After FS, I used a curve adjustments layer to further fix the skin tone under the eyes. I lowered the blue channel while very slightly lifting the red and RGB channels until it matched the rest of the skin tones.
For example, a lot of the time under-eye discoloration can be fixed by lowering the blue channel and increasing both the red and RGB channels. This applies to any areas of the skin where it looks either too red (that’s mostly happening in the midtones) or too blue (which is mostly happening in the shadows).
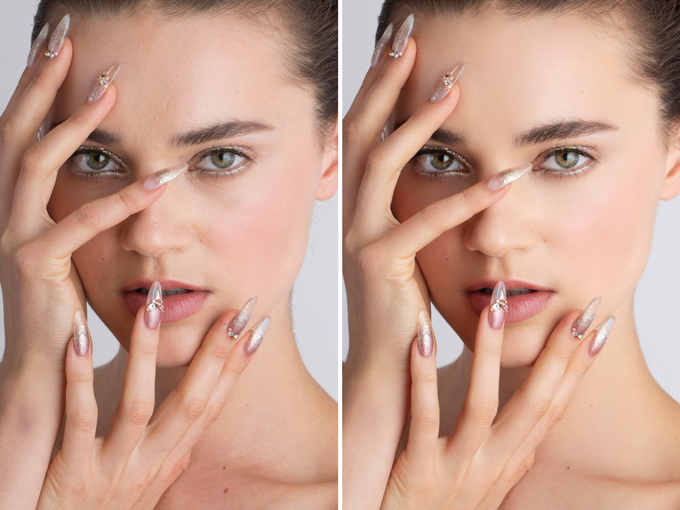
Using individual curve adjustment layers, I was able to further adjust the chest, hands, forehead and under-eye areas to even out the skin tones after FS.
Step 4: Remove Distracting Elements
This includes things like cleaning up stray eyebrows hairs and bloodshot eyes. I also use this step to remove any single strands of hair that I find distracting. My favorite tool for this step is the healing brush, though I will alternate been the healing brush and spot-healing brush.
Step 5: Dodge and Burn
I create a dodge-and-burn layer to bring up the highlights on the hair as well as brighten the eyes and teeth. My method typically involves way more dodging than burning, and I almost exclusively only dodge the highlights. When I do use the burn tool, it’s usually to darken the part in someone’s hair or darken their eyebrows slightly, in which case I burn the midtones. In order to keep this from going too far, I leave my exposure set at 10 percent.
Step 6: Final Color Pass
Now that the skin has been perfected and all distracting elements removed, I move on to the final color pass. For me, this comprises three very simple adjustments: I increase the contrast a bit, which will naturally add a tad of saturation; sometimes I adjust the hue, saturation and lightness of the background color; and then I add a very subtle film grain, which I feel helps with the textural aspect of the skin.
My goal is to keep the integrity of the subject’s skin—both its texture and natural attributes—while making it appear perfect. I’m successful when you look at the final image and don’t think about the retouching.
Related Links:
Lindsay Adler’s Skin Retouching Theory and Take-Home Tips
A Handy Guide on Outsourcing Your Retouching
How to Light Dynamic Beauty Shots When You Don’t Have a Beauty Dish [VIDEO]
As a thank you to our readers, we’re pleased to offer you a Rangefinder exclusive discount code to get 25% off The Portrait Masters course below. Use the code RF25 at checkout to redeem. This code cannot be used in combination with other sales.
