
How To Elevate Your Ambient Portraits With Flash and Video Lights
April 28, 2016
If you’re like me, you started in weddings by taking mostly available and unmodified sunlight portraits—pictures of the bride and groom in the sun and shade. The problem is that many new photographers do the same thing. Furthermore, these images are often flat and one-dimensional. This all makes it difficult to break away from your competition.
The answer is to elevate your portrait work by creating more variety and dynamic images with flash and video light. Don’t worry. It’s not hard and will not disrupt your current workflow.
Here’s the plan: Keep taking natural light photos and keep delivering the style of images your client is expecting. Except this time, when shooting, start incorporating flash at the end of your available light portrait time for 5 to 10 minutes. Later on when it gets dark, pull your couple aside for a dramatic video light shot. All you need is a camera with an LCD screen on the back, the light and a lightstand/assistant. That’s it!
OFF-CAMERA FLASH
Ashly and Stephen recently moved to downtown Los Angeles from Texas to start their new lives together. It was important to them that their engagement photos showed off their love for their new city. I suggested the helicopter pad of their building because of the sweeping views of Los Angeles. (Editor’s note: for more inspiration on capturing and conveying the energy and personality of your couple during engagement shoots, check out the Callaway’s CreativeLive video tutorial here). When I started shooting, I began as I always do: photographing Ashly and Stephen in natural light.
The picture directly below was photographed in natural and available light; nothing tricky. To properly expose for their faces, the background became blown out. This makes it difficult to tell where they are. And that’s okay. The picture works because of the unique composition, tone and their postures. It’s available light and it’s how our team starts every shoot.
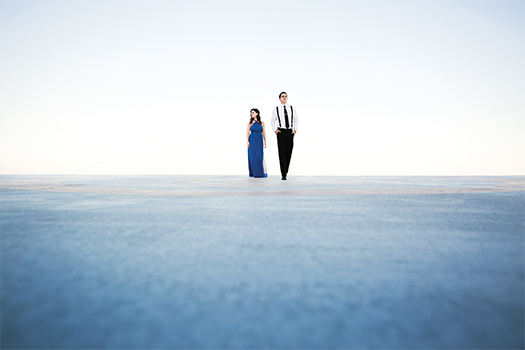
All photos © Callaway Gable
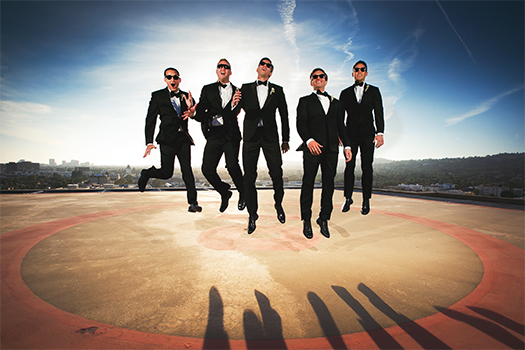
After awhile I will ask myself, how can I add more variety and create more depth to the same exact setup? The answer: bring in the flash! The second photo (below) was taken just moments after the first. See how there is much more detail and layers in the second image? I can see that they are on the helipad in the middle of downtown Los Angeles, dressed to the nines and looking amazing.
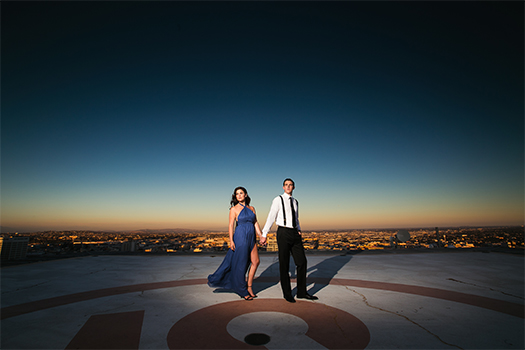
Both photos work, and many may argue that they prefer one photo over the other. That’s my point: bringing in the flash allows me to create more variety to their session, and in doing so, create more value. It also helps me create an image that doesn’t look like everyone else’s.
So how did I create the flash image? Think about it this way: there are two exposures happening at the same exact time—one for the overall scene and one just for the people. Huh? Let me break it down: the camera and its settings are only for the overall scene (no people). The flash and its settings are only for the people.
CAMERA STEPS
1. Attach a Wide-Angle Lens. A wide-angle lens produces a natural vignette that helps pull the viewer’s eye toward the middle. It also allows you to get closer to the subject with your light and camera.
2. Adjust your camera settings
• Use Manual Mode
• ISO: 200 (100 or 50 if your camera allows)
• Shutter Speed: 1/200. You want to choose the fastest sync speed possible. For the Canon 5D Mark III, it’s 1/200th. Please check your manual for your exact camera model’s max sync speed.
• Aperture: f/11. The only setting you’ll adjust.
3. Meter and take a test shot. Expose for the scene without the people. I prefer the sky to be exposed one or two stops darker than it appears. Generally this is f/11. Look at the LCD screen on the back of your camera. If the sky is too dark, move the aperture to f/10 or f/9. If you feel the sky is too light, move the aperture to f/12 or f/13.
4. Lock it down. You are not going to touch your camera settings again. Take a deep breath—you are halfway there. Now let’s bring in our couple?, about 12 feet from your camera.
FLASH STEPS
1. Adjust your flash settings:
• Manual Mode
• Full Power, which is 1/1
2. Position your flash. Place flash 12 feet or so from the couple with either your light stand or assistant.
3. Take a test shot. Look at the screen on the back of your camera. Is the couple too bright? Turn the flash down and/or move it farther away. If they’re not bright enough, move the light closer. Like what you see? Start shooting. Want to add more people in the shot? Just add in another flash!
VIDEO LIGHT
Once the sun goes down or I go indoors, my favorite off-camera lighting tool is video light, specifically the GL-1 Hotlight from Lowel. This light works like a spotlight, only illuminating what you want to see. You simply point it and take the photo. It is powerful, adjustable, zoomable, tungsten-balanced and very easy to use. It’s an integral part of my creative process.
Stay True to Their Story
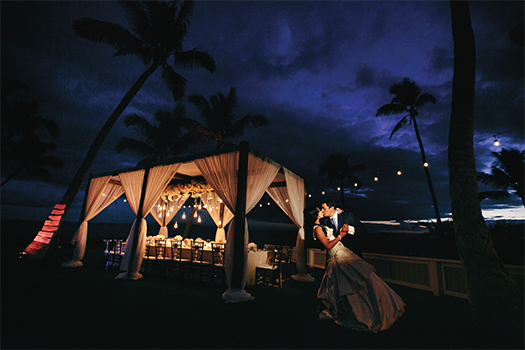
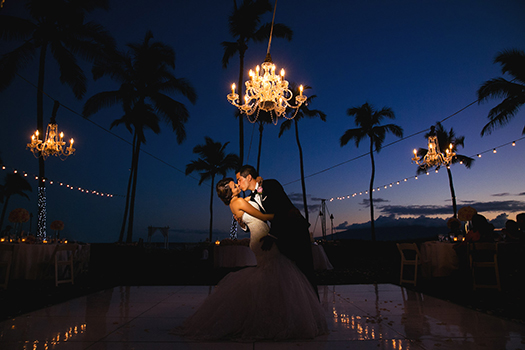
Alex and Robert were married at Sugar Beach in Maui. Just as the sun went down, I noticed how beautiful their lit dining area was against the dark blue night and palm trees. I immediately knew that I wanted to create an image that looked exactly like what I was seeing, and what Alex and Robert were experiencing. One of the drawbacks of using flash, especially at night, is that the flash often illuminates more than just the subject. This is called spill. The flash would have lit up and spilled onto a big part of the lawn and the front of the dining area. All of that light would have changed the feeling of the composition, thus not necessarily staying true to their story. Using the video light allows me to quickly paint a kiss of light just on them and capture the scene as Alex and Robert are experiencing it.
The Process is the Same as Using Flash
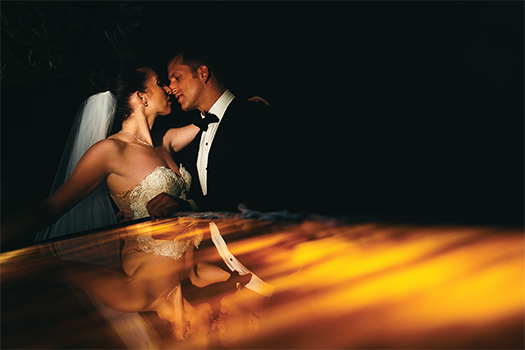
1. Adjust your camera settings so your exposure looks exactly like what you are seeing. For a nighttime shot like this, my settings will usually be ISO 3200, shutter speed 1/200 and aperture around f/4.
2. Switch to Live View Mode on your camera so that you can see how the image is going to look.
3. Turn on the video light and point it at the couple.
4. Adjust the zoom and power of the light until you like what you see on the back of your camera.
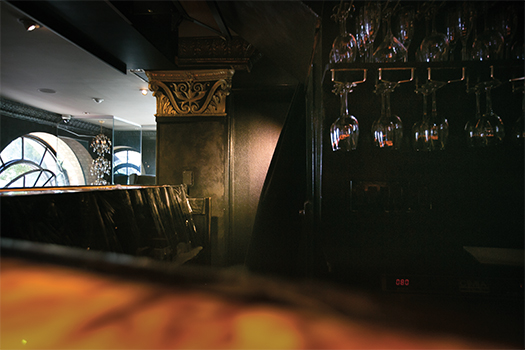
Make Horrible Locations Beautiful
On our way out of their hotel, Kate, Mike and I passed the hotel bar. I noticed that the top of the bar was lit up and I thought, I can compose a shot with that. The problem was that the back of the bar wasn’t visually appealing.
The solution was to expose for the scene, which in this case meant not overexposing the highlights in the bar. Once the camera was set, my assistant brought the GL-1 Hotlight in and adjusted the strength in an instant. Total time from concept to execution: 1 minute.
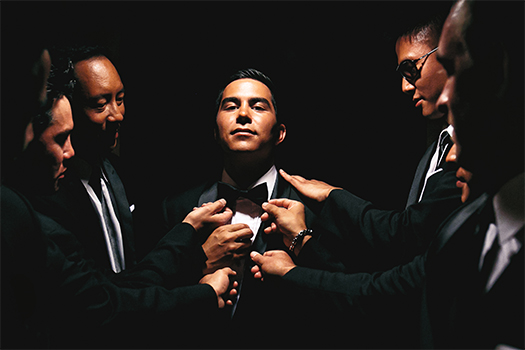
Make Something out of Nothing
We all know that there is never any time at a wedding. This is my favorite part about the light: it is so fast to use that you can quickly create dynamic portraits when you have nothing. Stephen and his guys were literally waiting for the elevator. It was high noon in a dark hotel hallway. In just a few seconds I was able to turn on the light, position the guys and take the photo—all before the elevator arrived.
Now you have added a couple of off-camera light tools to your wedding photographer tool belt. With practice you should be able to set up flash and video light shots in just a few seconds. When I started, I practiced during engagement sessions. Engagements are the perfect place to experiment and play because you are not limited by time. Try using modifiers like umbrellas and grids. The sky’s the limit on what you can do. The only requirement is that you have fun and practice, practice, practice.
Brian Callaway is the owner and principle photographer of Callaway Gable—a multiple award-winning photography studio specializing in weddings in Southern California and around the world—that he runs with his wife, Allison.
See the full article in the April 2016 Digital Edition
Related: CreativeLive Video Tutorial: Extraordinary Engagements
Making a Typical Wedding Shoot Atypical
Related Articles

Why Felix Kunze Thinks We’ve Been Overcomplicating Lighting (And What He’s Doing About It)
July 24, 2025
When it comes to lighting in photography, most of us instinctively reach for soft, flattering light. We diffuse our flashes, shoot through umbrellas, and seek out cloudy days. But what if I told you that some of the most striking portraitYou know the moment: your subject is ready, you’ve got about five feet of space to work with, and the...
More »

How to Photograph Fireworks for Couples Portraits
October 24, 2024
Fireworks aren’t just for the Fourth of July! You’ll find them regularly at theme parks, sporting events, and maybe more surprisingly, at weddings. For the latter, fireworks offer photographers a wonderful opportunity to capture epic couples portraits with a truly unique backdrop. Of course, if you’re not familiar with how to photograph fireworks, there are some basic tips you’ll want...
More »

Why Top Photographers are Embracing Hard Light (And You Should, Too)
October 23, 2024
When it comes to lighting in photography, most of us instinctively reach for soft, flattering light. We diffuse our flashes, shoot through umbrellas, and seek out cloudy days. But what if I told you that some of the most striking portraits actually come from embracing hard light? That’s exactly what renowned photographer Roberto Valenzuela teaches in his groundbreaking new Dynamic...
More »
