
First Exposure: Alien Skin’s Eye Candy 7
February 6, 2013
Alien Skin is best known to photographers for its Exposure, Blow Up, Bokeh and Snap Art software. But Eye Candy 7, its latest release of software that is more targeted to designers, should also be of interest to many portrait, wedding, high school senior and art photographers for its ability to create unique special effects and to manipulate type used in title slides for still photo and video productions.
So why would a photographer need a set of plug-ins that is primarily marketed to designers? Because we as photographers are now faced with many of the design tasks once done by designers. We are designing wedding albums from front cover to back, creating backgrounds and buttons for web pages, adding type to senior and event photos as well as our own prints, producing audio-visual presentations, and creating art photos for sale online or in our studios. Eye Candy 7 has effects that speed portions of the workflow for all of these tasks.
As with other Alien Skin products, Eye Candy 7 is a Photoshop and Photoshop Elements plug-in. However, Adobe Fireworks and Corel PaintShop Pro, which were supported in previous versions of Eye Candy, are no longer supported as host applications.
Alien Skin continues to revise the Eye Candy interface, and this time, I think the company nailed it. The look is updated to a large central preview/workspace window surrounded by a light gray border, with the Effects panel on the left and the Customization panel to the right. The Effects panel uses white type on a medium gray field set against a dark gray background. The Customization panel uses white type and gray sliders on a dark gray background—very modern looking and easy on the eyes. I would like the option of seeing the image preview against a black background as one of the preferences, but the only option for customizing the interface is associated with how the background is drawn for images with transparency.
With the new interface, Alien Skin has rearranged the effect filter selection icons. Eye Candy 5 split the collection of filters into three separate products. Eye Candy 6 gathered the filters back into one collection of 30 filters. Eye Candy 7 contains 32 distinct filter effects evenly organized into two groups—Shape and Texture—which display at one time. Shape effects are designed for objects with distinct edges, such as text, logos, or an image selection. Texture effects are designed to be applied to an entire image. For example, you can use them to create a background or to overlay an effect on an image. And all of the effects are now located in the Photoshop Filter menu.
While there are 32 available effects, the variations are close to infinite. You can adjust every effect using sliders in the Customization panel. If that weren’t enough, there’s a Random Seed button in the Customization panel that randomly changes the effect, sometimes in wild ways. If you like a Random Seed option, make note of the number next to it. If you press the button again, there’s no efficient way to go back to the one you like without entering the number into the box.
All Photos courtesy of Stan Sholik
Top: The interface is completely redesigned and all of the effects are available from the Filter window. Effects are available in two groups: Shape and Texture.
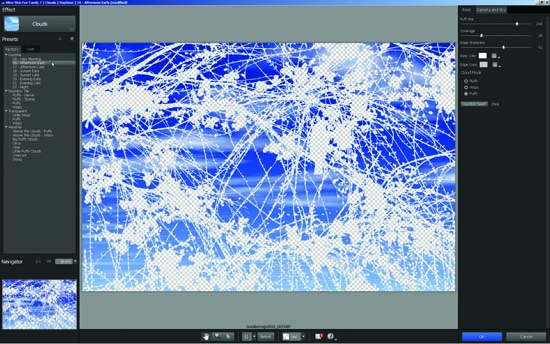
Middle: Texture effects, such as Clouds (shown here) act on areas of the image containing RGB information, while the Shape effects act on transparent areas of the image. The number of Clouds effects and the number of sliders for customization of the effect are typical of all of the effects.
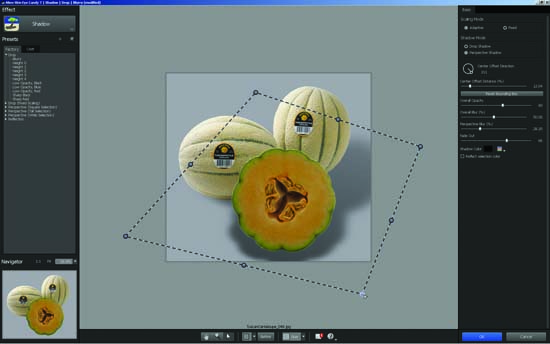
Bottom: I first cut out the cantaloupes from their background, but changed the transparent background to gray in Eye Candy 7 using a tool below the preview window so that I could see the shadow better. The perspective shadow effect gives you complete control of the shadow angle, density, falloff and more. You can also select to have the shadow and most other effects scale with the image if you change image size.
With Eye Candy 7, you open an image in Photoshop or Photoshop Elements and click Alien Skin>Eye Candy 7 from the Filter menu. Your image opens in a new window in the Eye Candy 7 interface. Once the image is open, you select a large button located at the top of the left panel displaying the last effect you used.
A window pops up displaying all of the effects. This is a much smoother workflow than previous versions of Eye Candy, and with version 7, you can now experiment with different effects without having to cancel out of the program and reopen it.
After you choose an effect, the Effect window closes and presets for the effect are displayed in a list. Mousing over the names applies the effect in its default configuration in a small navigator window at the bottom of the left panel.
The Navigator also controls the zoom level of the preview image. Quick access is provided to 1:1 and Fit views with ten other preset magnifications available in a drop-down menu. You can also use the Navigator to navigate through the image rather than selecting the hand icon below the preview.
With a preset selected, you may need to move or zoom the image in the preview image, or reposition the effect. Tools for doing these adjustments are located directly below the preview window. Then it’s time to move to the Customization panel on the right. Here you have options that change with each preset. On a fast 12-core 64-bit Windows computer with 16GB of RAM, there is only a slight lag to update the preview on a 12-megapixel image when you adjust the sliders. Effects and adjustments applied to type redraw instantly. Performance will vary depending on your computer hardware and image size.
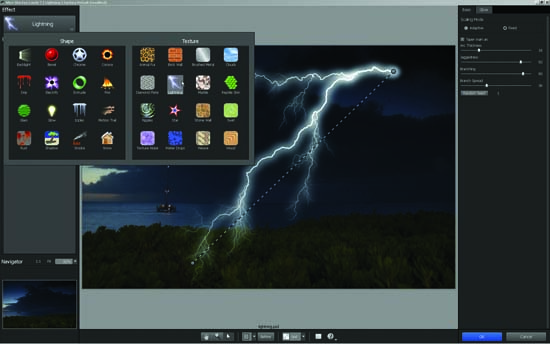
There are three new effects in Eye Candy 7. The first two, Lighting and Clouds, are found in the Texture group, and the third, Electrify, is found in the Shapes group. I found both Lightning and Clouds to be believable enough to use on my photos, as well as the older Smoke, Water Drops, Shadow and Glow effects. You’ll likely have your own favorites.


I wanted to turn the original image (top) into an image that made it appear you are viewing a storm through a rainy window. First I added and customized a new lightning effect (middle), then added and customized a water drop effect (below).
By default, EC6 filters will act non-destructively on your image by duplicating the layers below and applying the result to a new layer above the layer on which you are applying the filter. You can change this setting in the preferences to apply the effect directly to the image when you return to Photoshop, or to apply it to its own layer in Photoshop. This last option gives you the ability to dial down the opacity of the effect, although you can also do this directly in Eye Candy 7. But to apply multiple effects, you must apply one, save it, and then reopen the new image in Eye Candy 7. The effects will also act as a Smart Filter, allowing you to adjust them at a later time, if you apply them to a Smart Object in Photoshop.


The Clouds effect is new in this version. The effect can turn a boring blue sky (top) into something much more interesting (below) and the result is believable.
Eye Candy 7 is available from Alien Skin (www.alienskin.com) for $199 for new users ($99 as an upgrade from any previous version of Eye Candy or Xenofex products). Installation is limited to one computer. A trial version is also available from the Alien Skin website.
As photographers are forced to take on more design responsibilities for themselves, tools such as Eye Candy 7, which are easy to use and capable of speeding our workflow, become very valuable to own.
SYSTEM REQUIREMENTS
Microsoft Windows:
At least an Intel Core 2 processor
Windows 7 or later
A monitor with 1024 x 768 resolution or greater is required.
Apple Macintosh:
At least an Intel Core 2 processor
OS X 10.7 or later
A monitor with 1024 x 768 resolution or greater is required.
HOST REQUIREMENTS:
* Adobe Photoshop® CS5 or later
* Adobe Photoshop Elements 10 or later
Stan Sholik is a commercial/advertising photographer in Santa Ana, CA, specializing in still-life and macro photography. His latest book, Lightroom 4 FAQs, published by Wiley Publishing is now available.
Related Articles

Infinite Color: Color Grading Photoshop Tool with Infinite Options
June 13, 2024
Working as a retoucher, one of the hardest parts of my job wasn’t even the clean up work that an image typically requires, it was the color grading. Applying a specific look to an image to really enhance or create a mood that meets the client’s vision was either doable or really hard. There was never a time when it...
More »

Adobe Max Roundup: Exciting New Features
October 19, 2023
Adobe Max, the company’s annual creativity conference, has just ended, leaving the latest innovations and features across Creative Cloud. You can revisit many of the keynotes and presentations on the Adobe site, but we’ve put together a quick overview of some of the most exciting photo and video news. Lightroom Most of the new features are available for all Lightroom...
More »

Nikkor Z Releases New Lenses & Tether Tools Updates Software
June 30, 2023
Nikon Z 70-180mm f/2.8 Good news for Nikon Z shooters! Nikon has added two new lenses to its Z-series line: the Nikkor Z 70-180mm f/2.8 and the Z 180-800mm f/5.6-6.3 VR. While the latter is best left to wildlife and sports photographers, we think that the Z 70-180mm f/2.8 model looks like a solid lightweight alternative to its more established...
More »
