
Software Review: Experimenting with HDR Express 3
December 29, 2014
High dynamic range (HDR) imaging has found a place in the toolbox of professional and enthusiast photographers. But for newcomers, the learning curve can be steep—not so much on the capture side, but rather in post-processing. There are a number of sophisticated HDR post-processing programs on the market, but few for photographers who want a taste of the realistic—as well as the other-worldly—results possible with HDR.
Unified Color produces two of these sophisticated programs—HDR Expose and 32 Float—as well as the perfect introductory-level HDR program, HDR Express. With the release of version 3, Unified Color has made HDR Express even more accessible and user-friendly.
HIGH-END FEATURES
HDR Express 3 adds to the functionality of the previous version by incorporating some of the features of its higher-end programs, but without making it more difficult to learn or use. The initial screen to merge source images now has radio buttons to filter images in a folder, rather than a drop-down menu. A new option for DNG images has been added to those for RAW, TIFF and JPEG files.
During a series of HDR captures, objects moving in the frame from capture to capture cause “ghost” images if the software does nothing to eliminate them. Every HDR program uses some technique to exorcise ghost images, but the most successful method is found in higher-end HDR programs, and now incorporated in HDR Express 3. This method involves choosing a “key frame,” or one of the captures that has the moving objects in the position you want them. Any change in position of these objects in other captures is ignored when creating the initial HDR image.

Even with the local contrast (Detail slider) nearly set to maximum, Express 3 creates an image with far less of a grunge look than that possible with other HDR programs. All photos © Stan Sholik
The problem with using a key frame is that often, you don’t know if you’ve chosen the correct capture until the program has merged the images together. Express 3 eliminates this issue by allowing you to choose a key frame and run a quick (and small) preview of the merged result. Using this tool, I was able to choose a key frame without a bird flying through it, which saved me from having to spend time cloning out its ghosts in the merged HDR.
GOODBYE, HISTOGRAM
Unfortunately, these changes to the interface resulted in the elimination of the histogram of the source images that was available in version 2. Perhaps this is justified in an introductory-level HDR program in which users may not understand its usefulness. But I miss the ability to see where the dynamic range of each of my captures lies relative to the frame ends of the histogram, and the ability to exclude any captures that would add little information to the HDR because they are too over- or underexposed.
Other than eliminating the histogram, these changes to merging source images are welcome. But they didn’t prepare me for the surprise that awaited me when I clicked the Merge button. I often shoot seven or nine captures to create an HDR image, and must patiently wait while the HDR program aligns, de-ghosts and merges them. HDR Express 3 virtually eliminates the waiting. Where HDR Express 2 was about average among HDR programs when creating the initial merged image, Express 3 takes only about a third as long. This is a most welcome speed boost—and it puts Express 3, along with the other Unified Color HDR programs, among the fastest in creating the initial merged image.
ADJUSTMENT WORKSPACE
Once Express 3 creates the initial HDR image, the image opens in the adjustment workspace, which includes a set of presets to get you started. By clicking on the presets and watching the position of the sliders in the panels to the right of the preview, you can see the result of adjusting the sliders in various ways. You can also create your own presets.
The black-and-white presets achieve their look by simply desaturating the image. If you are looking for a monochrome result, you will have more control by exporting a color image and using a more complex approach. But in keeping with the program’s appeal to users new to HDR and the presence of other sliders to adjust tonality, it does have a place here.
Above the adjustment panel is a 32-bit histogram. The histogram is surrounded by a gray zone that shows the typical dynamic range of a computer monitor. By properly tone-mapping the image, you can bring the entire 32-bit HDR image into the display zone of the monitor, and thus your printer if you plan on creating a print. Clicking the ‘H’ (highlight) or ‘S’ (shadow) in the histogram panel displays warning zones in the preview for tones outside of the dynamic range of the monitor.
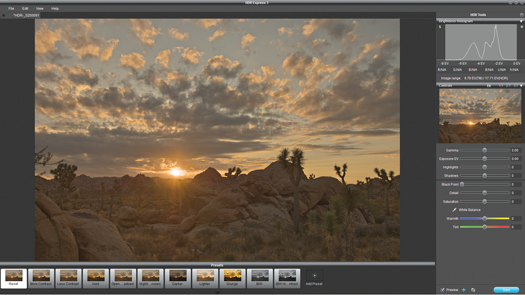
The initial HDR image created with Express 3 generally looks flat. The gray box around the histogram in the upper right shows that the dynamic range of the HDR image is well within the dynamic range of the display.

By adjusting the sliders below the histogram or by choosing a preset first and adjusting, you can match the dynamic range of the image when it is exported to the dynamic range of your display. The Detail slider adjusts local contrast.

You can zoom into the image at set ratios and navigate through it to view the effect of your adjustments.
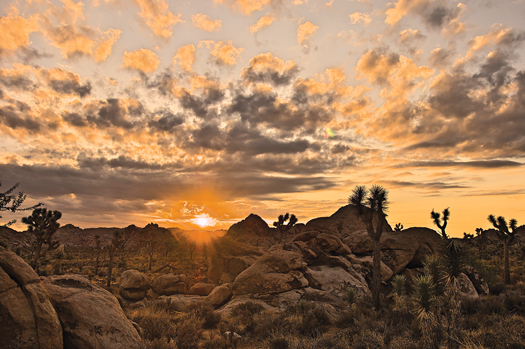
The end result. Express 3, along with the other Unified Color HDR software programs, is a good choice for creating natural-looking HDR images.
SO MANY SLIDERS
The sliders in the adjustment panel allow you to perform the necessary tone-mapping. The sliders for exposure, highlights, shadows and black point are self-explanatory. New to Express 3 is a Gamma slider, which adjusts the shape of the histogram curve, changing the relationship of midtones and shadows without affecting the highlights. It’s a powerful and effective tool for adjusting the image, but takes a little playing with to understand. As with all of the adjustment sliders, the result of moving them is displayed in the preview. Unfortunately, the results are not dynamically displayed—you must move the slider to a new value and release the mouse to see the result.
There is also a Detail slider to adjust local contrast and a Saturation slider, as well as a white-balance eyedropper and Warmth and Tint sliders. There are fewer available adjustments than found in the other Unified Color HDR programs, but enough to give someone starting out in HDR imaging a fast, easy and natural-looking result.
For new users, the retail price of HDR Express 3 is $119. The price to upgrade from previous versions is $59. Visit their website for more information and excellent tutorials.

SYSTEM REQUIREMENTS
OS: Intel-based Mac OS 10.6 (Snow Leopard) or later; 32-bit or 64-bit Windows (Vista, Windows 7, Windows 8)
CPU: Dual-core 2.0GHz minimum; quad-core, 2.8GHz recommended for best performance
RAM: 2GB minimum, recommend 4GB
Video: Recommend 128M video memory minimum
Related Links
Plug-In Review: Imagenomic for Portraiture
The Year in Tech: Better Software, Lower Prices and an Invitation to “Hack”
Still and Video Editing Software Updates from Adobe, Phase One and Nikon
Related Articles

Infinite Color: Color Grading Photoshop Tool with Infinite Options
June 13, 2024
Working as a retoucher, one of the hardest parts of my job wasn’t even the clean up work that an image typically requires, it was the color grading. Applying a specific look to an image to really enhance or create a mood that meets the client’s vision was either doable or really hard. There was never a time when it...
More »

Adobe Max Roundup: Exciting New Features
October 19, 2023
Adobe Max, the company’s annual creativity conference, has just ended, leaving the latest innovations and features across Creative Cloud. You can revisit many of the keynotes and presentations on the Adobe site, but we’ve put together a quick overview of some of the most exciting photo and video news. Lightroom Most of the new features are available for all Lightroom...
More »

Nikkor Z Releases New Lenses & Tether Tools Updates Software
June 30, 2023
Nikon Z 70-180mm f/2.8 Good news for Nikon Z shooters! Nikon has added two new lenses to its Z-series line: the Nikkor Z 70-180mm f/2.8 and the Z 180-800mm f/5.6-6.3 VR. While the latter is best left to wildlife and sports photographers, we think that the Z 70-180mm f/2.8 model looks like a solid lightweight alternative to its more established...
More »
