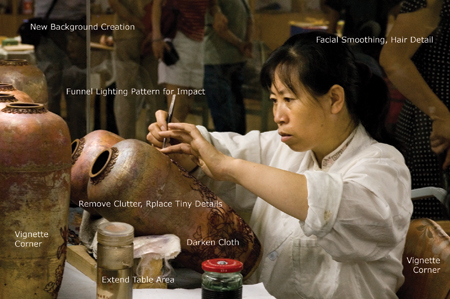
It’s not everyday that the retoucher is called upon to take a snapshot to competition level. A handful of prizes for photographic art and electronic image enhancement were the reward of a jointly authored image that started with a jigsaw puzzle-like jumble of unwanted elements, bad lighting conditions and an unattractive, busy background. My magic wand of enhancement and retouching techniques turned Fabian Krajmalnik’s single grab shot into a loan collection winner, the top O’Reilly Media Photoshop retouching award and a finalist in the 2006 Eventpix Before and After competition.
An essentially excellent composition with directional, though mixed color illumination, and an intrinsically interesting subject were virtually invisible, obscured with clumsy clutter. Simplification and eradication were an obvious necessity. Extensive attention to tiny, subtle elements was also needed to attract the attention of detail-oriented competition judges.
The original image was made under very difficult conditions, during a tour of a crowded cloisonné art workshop in Beijing. Lighting was dim and off-color. The only possible photographic angle was filled with parts of visitors’ bodies in the background. Chemical jars and dirty rags littered the foreground. Fabian set his Nikon D70 on Program at ISO 1600 and fluorescent white balance. One shot was all it took.
The enhancement problems themselves, though complex and time consuming, were the same basic concerns that confront the retouch artist everyday. To achieve the dark, old-world portrait feel, the background had to be entirely replaced. Foreground clutter dictated that many items be removed, fine details recreated, tones neutralized and areas extended. Familiar needs were facial and clothing retouching, color correction, defining and saturating lighting and vignetting corners to concentrate impact and meaning.
Worried that I might not be able to make the background look good, I started there first. Phoenix-like, the new background was recreated from itself, with a patient method that combined the Patch Tool and Healing Brush. Close to 100 irregular patches were blended over and over each other using abstract bits of existing background. Since the Patch Tool does not replace, but rather interprets texture and tone based on the underlying area—soft, blurry dark colors were the artistic result. I cleaned up areas right around the face, hands and clothing with the Healing Brush in Replace mode, semi-soft. This technique, even though in 8-bit JPEG, did not create artifacts, and effectively echoed the mottled appearance of the metal vases.
Cautious not to lose more than four hours of time, I both saved a newly labeled file several times and also made periodic History snap shots to be able to return to a previous stage after perceiving an error.
Gross color correction, which I would normally do first if not confronted by the serious background problem, was done in Levels, with selective fine adjustments in Color Balance for the skin tone and smock. Selective Saturation was added with the Sponge Tool until the metal glowed. Only slight smoothing of the skin was needed, with the Blur Tool set on 15% opacity and a soft brush.
I thought the background was difficult, but the foreground was worse, and took several more hours. Cropping off most of this area was impossible, because that would have compromised the composition. Very detailed remove-and-replace work must be approached by enlarging the area to high magnification and working slowly, just a few pixels at a time. Take away unwanted items by cloning in neighboring details. I use either the Healing Brush, always on a layer, in replace mode, or Marquee a larger area, and copy it to a new location. Brushing on a layer mask cleans up the overlap, before merging layers down. The blend of the floral metal design was actually easier than the cloth and wood areas, which easily revealed telltale signs of digital cloning. A soft brush in color mode with the color picker set on a medium warm neutral tone darkened the white cloth to an inconspicuous oily brown.
Edge vignetting enhanced the low-key feel. Highlight density was decreased to funnel the light most effectively toward the face. This way the storytelling power of the image relies on the concentration in the eyes of the artisan and the dancing grace of her hands as she manipulates the delicate metals. To size the image for printing and sharpening I favor Fred Miranda’s automation for Stair Interpolation and actions for sharpening, available inexpensively from FredMiranda.com. That completed the enhancement, or so I thought.
I thought I was done, but the next day a friend pointed out a tiny distracting triangle of white coat near the artisan’s lip and some repetitious details in the complicated cloth and wood recreation. What happened was that I didn’t look carefully enough when making the final evaluation. It’s best to highly magnify when doing the close work, but frequently back out of the image to consider the effect of the whole image at 100% or even less. The first draft can always stand a further edit. When you find an error or insufficiency in enhancement, don’t leave it as “good enough.” That’s not how to win awards or dollars from clients. Exceeding expectations is what it’s all about.
Sara Frances and Fabian Krajmalnik are both Master Photographers, and popular instructors. Read more of Sara’s award-winning Photoshop step-by-step techniques at www.creativepro.com. Contact her at [email protected]. Fabian can be reached at his website: www.fabianphotography.com.


